You draw a box around the part of a city you want. It builds the model while you watch, and hands you a file your slicer opens without an edit. There is nothing to install, nothing to upload and nobody making it for you at the other end — the model is meshed in the browser tab you are already sitting in.
What comes out is a small piece of a city as an object: the buildings at their real heights, the streets, the water, the parks and the shape of the ground under all of it, as one watertight solid that prints flat on the bed without supports.
Step 1 · Frame the part you want
Open the studio and type a place into the search box, or just drag the map until you are looking at the right streets. The box drawn over the map is the viewfinder: whatever is inside it is what gets printed, and nothing outside it does.
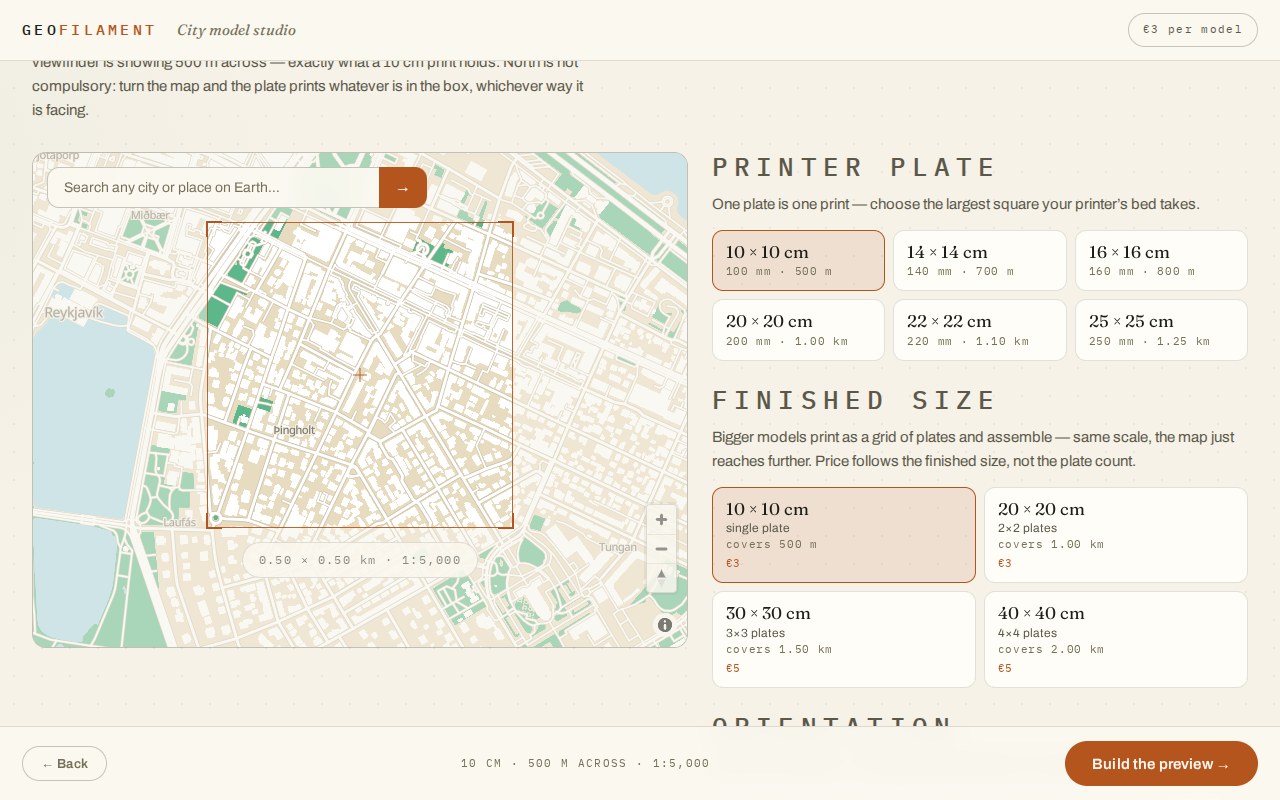
Every model is made at the same fixed scale, so the size you choose is also what decides how much city fits inside the box: a 16 cm plate holds 800 m of ground, a 40 cm one holds two kilometres. That is why the size cards sit next to the map rather than on a screen of their own — they are the same decision.
North is not compulsory. The compass under the size cards turns the frame, so a harbour that runs south-west can sit square in the box instead of across a corner, and the plate prints whatever is in the box whichever way it is facing.
Step 2 · Choose how big it should be
There are two ways to say it, and they answer two different questions.
- Square plates — start from your printer. Pick the largest square its bed takes, then how many of those squares the model should be. One plate is one print; a 2 × 2 is four prints that assemble into a model twice as wide.
- Custom size — start from the wall. Type a finished size, or take a picture-frame one (A4, A3, 30 × 40 cm), and the studio works out the plate layout that fits it. No run of square plates lands on 21 × 29.7 cm, which is the whole reason this second way exists.
The price follows the finished object rather than the number of prints it takes to make it: €3 up to 25 cm, €5 up to 50 cm, €8 above that. A 40 cm model costs the same whether it comes off the bed in four pieces or in sixteen.
Step 3 · Build the preview
Press “Build the preview”. The studio goes and gets the map and the ground heights for the square you framed, meshes the model, and puts it on a turntable you can drag to spin and scroll to zoom. It usually takes a few seconds, and up to half a minute for a large frame — nearly all of it spent waiting on the map rather than on the meshing.
This is the model, not a picture of one. If the frame was not quite right, step back, move it and build again as often as you like. Nothing is charged and nothing is decided until you say so.
Step 4 · Buy it, once
The order step prices what you have made and hands over the files. You will be asked to sign in first, which is what puts the purchase somewhere you can find it again rather than in a link you have to remember to keep.
What you buy is the model rather than the moment. You can re-open it and download it again as often as you like, on any device, and you can move or turn the frame anywhere inside a generous box around what you bought — half again as wide as the print itself — and download the re-framed plate for nothing. Printing it is unlimited, for your own use.
Step 5 · Slice it and print it
Three formats, and which one you want depends on your printer rather than your slicer.
- 3MF — the one to take if you have an AMS, a CFS or any multi-material setup. Every layer of the model arrives as a named part already assigned to a filament slot, so the slicer opens it with the colours in place and nothing to move, scale or line up.
- STL — one mesh per plate, for a single-colour printer, or for painting it afterwards.
- OBJ — the same, with a colour file beside it for anything that reads one.
The files are in millimetres, Z-up, and already sitting the right way round: print each plate flat on the bed exactly as it comes. A 0.4 mm nozzle with 0.16–0.2 mm layers gives good detail on the buildings. Nothing in the model needs supports — every overhang carries itself, down to the arches under the bridges — so a plate comes off the printer as one piece, finished.
Four filaments, never more: sand for the ground, white for the buildings and roads, pale blue for water, green for parks and trees. A model that has no water or no parkland in it simply uses fewer.
Step 6 · Glue the plates, if there is more than one
Anything bigger than one bed comes down as a grid, and the download is a zip holding every plate plus a guide saying which plate is which corner. Print them all, lay the whole grid out dry before any glue comes near it, and check the streets run across the joins. Then a thin bead along the meeting edges and a flat board underneath while it sets.
The seams are planned rather than sawn: a building the grid happens to run through is worked out for the whole model first, so it prints at the same height on both plates and meets itself at the join. The plates are flat-edged squares, so they butt up against each other with nothing to align.
That is the whole thing
A minute at the screen, a print, and — if you asked for a big one — an evening with the glue. If you would rather see one finished before you make your own, the gallery has 247 cities already made up, each one opening in the studio at the frame it was drawn from.
Passing it on
The reel at the top of this page is free to use, and so are the words below it — the same six steps at the length a feed will watch. Press Copy and it is on your clipboard. The film itself, the vertical cut for a phone and both posters are in the press kit on the launch post.
How-to reel — LinkedIn
Goes with the reel at the top of this page. Upload the square cut natively rather than linking it.
Your city, printed. Six steps, and about a minute of them at the screen.

GeoFilament turns any square on Earth into a model your printer understands. No app, no upload, and nothing to model yourself.

1 · Frame it — search a place or drag the map. The box on the map is the print.
2 · Size it — start from your printer's bed, or type a finished size (A4, A3, 30 × 40 cm) and it splits into as many plates as it needs.
3 · Build it — the model meshes in the browser tab you are already sitting in. Terrain, water, roads, parks, trees and every building.
4 · Buy it — €3 up to 25 cm, €5 up to 50 cm, €8 above that. Yours to re-open, re-frame and download again as often as you like.
5 · Print it — 3MF with the four filaments already assigned to their slots, or STL and OBJ. Millimetres, Z-up, flat on the bed, no supports.
6 · Glue it — only if it is bigger than your bed. The seams are planned, so a building the grid runs through prints at one height on both plates.

The plate in the reel is central Bergen, built by the same pipeline the studio runs — not an illustration of one.

247 cities are already in the gallery. Yours probably is not, and that takes about a minute to fix.

geofilament.mochi.is
How-to reel — Instagram, TikTok
For the vertical cut. A link is not clickable there, so the address is said rather than linked.
Your city, printed — in six steps.

Frame a square anywhere on Earth → pick a size → watch it build in the browser → download the files → print → glue the plates, if it is bigger than your bed.

Four filaments, one continuous body, no supports. Real ground, real buildings, at a true 1:5,000 — so any two cities come out the same scale.

247 cities already made. Yours takes about a minute.

geofilament.mochi.is

#3dprinting #3dprint #bambulab #3dprintingideas #citymap #maps #cartography #architecture #urbanism #makersgonnamake